

Filters
Shopping Options
Concrete Fence Posts
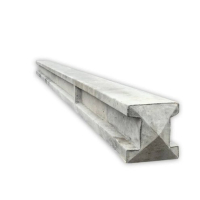
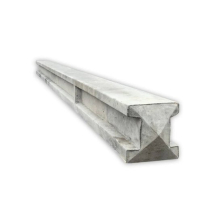
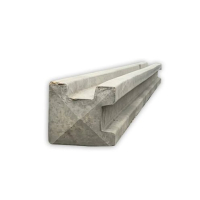
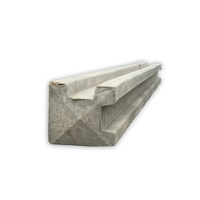
Choosing Concrete Fence Posts for Garden Boundaries
Concrete fence posts provide rigid, low-maintenance support for domestic panel fencing and do not rot or suffer insect attack like timber supports. The reinforced concrete fence posts in this range are designed to hold compatible fence panels and concrete gravel boards, with intermediate posts for straight runs and corner posts for right-angle changes of direction. Before ordering, establish the finished fence height, panel width, gravel-board size, ground conditions and every change of direction so the post type, overall length and quantity match the planned boundary.
Intermediate and Corner Concrete Fence Posts Explained
Intermediate concrete posts for fencing are installed between adjoining bays along straight sections of a boundary. Their opposing slots receive compatible panels or gravel boards from both sides, allowing one post to support the components in the bays immediately before and after it. Corner concrete fencing posts have slots positioned at 90 degrees for boundaries where two perpendicular fence runs meet.
The two post types are not interchangeable. Rotating an intermediate post will not create the correct right-angle slot arrangement, while installing a corner post within a straight run leaves one channel facing away from the fence line. Gate openings, fence ends and non-standard angles should be planned separately rather than adapted from standard panel posts.
Plan the post positions as follows:
- Straight runs – Use intermediate posts between adjoining fence bays.
- Right-angle corners – Use corner posts with both slots facing the planned runs.
- Gate openings – Specify suitable gate supports rather than relying on standard panel posts.
- Sloping boundaries – Decide where panels and gravel boards will step between levels.
- Direction changes – Mark every corner and irregular angle before ordering.
- Panel centres – Set the spacing from the actual components being installed.
A marked site plan makes it easier to calculate quantities and prevents incorrect post types being installed in key positions.
Setting Concrete Fence Posts at the Correct Depth
The required setting depth depends on the finished fence height, soil condition, wind exposure and foundation arrangement. Calculate the total post length by adding the above-ground height of the panel and gravel board to the embedment needed for the site. Avoid choosing posts from panel height alone, as this can leave insufficient length below ground.
The 8ft concrete fence posts measure approximately 2440mm overall, while 9ft concrete fence posts provide approximately 2745mm. Adding a gravel board increases the visible height of the fence and reduces the remaining length available for embedment when the same post size is used. Longer posts may therefore be appropriate for taller combinations, stepped boundaries or ground conditions requiring additional below-ground support.
Check the following before digging:
- Panel height – Measure the actual panel rather than relying only on nominal dimensions.
- Gravel-board height – Include the complete board height in the calculation.
- Ground level – Measure each position separately where the boundary slopes.
- Soil condition – Soft, disturbed or waterlogged ground may require a revised foundation.
- Wind exposure – Open and exposed boundaries place greater loads on taller fencing.
- Underground services – Confirm that the proposed fence line is safe to excavate.
Set each post plumb in both directions and brace it securely while the surrounding concrete gains sufficient strength.
Concrete Fence Posts vs Timber Fence Posts: Durability and Maintenance
For buyers comparing fence posts concrete options provide greater resistance to ground-level moisture, decay and insect damage than timber fence posts. Concrete posts can also remain in place when compatible timber panels need replacing, provided the posts are still correctly aligned and undamaged. Pressure-treated timber remains a practical alternative, but its service life depends on treatment quality, installation and continued moisture exposure.
Concrete posts are considerably heavier than timber alternatives. Plan access, lifting and hole positions carefully because they cannot be easily trimmed or adjusted once delivered to site. Timber posts are lighter, easier to cut and simpler to fix into, making them useful where access is restricted or non-standard alterations are required.
Key differences include:
- Ground contact – Concrete is not vulnerable to timber decay at soil level.
- Handling – Timber is generally lighter and easier to position manually.
- Adjustment – Timber can be cut more readily when site dimensions change.
- Maintenance – Concrete does not rely on preservative treatment against rot.
- Panel replacement – Slotted systems can allow individual panels to be removed.
- Installation accuracy – Concrete requires carefully located holes and controlled alignment.
Choose concrete where durability and reduced maintenance are priorities, or timber where easier handling and on-site adjustment matter more.
Slotted Concrete Fence Posts for Panels and Gravel Boards
Slotted concrete fence posts hold compatible panels and gravel boards inside formed channels instead of requiring the fencing components to be face-fixed through the post. Intermediate posts connect straight bays, while corner posts allow compatible components to meet at a right angle. The slotted arrangement can also make individual panel replacement easier when enough clearance is available above the fence.
The 8ft slotted concrete fence posts are listed for use with compatible panels up to 6ft, but gravel-board height and the required embedment must still be included when checking suitability. Measure the actual panels and boards before setting the post centres because nominal dimensions and manufacturing tolerances can affect the completed bay width. Components should enter the slots without excessive force or distortion.
Before the foundation sets, confirm:
- Post centres – Check the spacing against the panel or gravel board being installed.
- Slot direction – Keep each channel facing the correct adjoining fence bay.
- Component fit – Panels and boards should slide into position without being forced.
- Gravel-board level – Support adjoining boards at a consistent finished height.
- Post tops – Follow the planned level or stepped arrangement.
- Replacement clearance – Allow space for panels to be lifted out in future.
Installing one complete trial bay first can identify spacing, alignment or level problems before they are repeated along the boundary.
Installing Concrete Posts at Corners and Changes of Direction
Corner positions should be established before the intermediate holes because they control the direction of both adjoining fence runs. Rotate each corner post until both slots follow the planned 90-degree boundary lines, then check its height and plumb on both visible faces. Standard corner posts should not be forced into acute, obtuse or irregular changes of direction.
Once the corner is secured, run separate string lines along both sides and mark the intermediate positions using the actual panels or gravel boards. This prevents small spacing errors from accumulating towards the corner and keeps both runs straight. Non-standard angles require a separately planned end-post or fixing detail rather than twisting panels inside misaligned slots.
Use this installation sequence:
- Mark the corner and confirm the direction of both fence runs.
- Excavate the hole according to the post length and site conditions.
- Orientate the slots towards their respective boundaries.
- Check height and plumb before placing the foundation concrete.
- Brace the post until it can remain securely in position.
- Set string lines and measure the remaining bays from the completed corner.
Establishing the corner posts first provides reliable reference points for the spacing, direction and finished height of the remaining fence.
FAQs
Can you drill into concrete fence posts?
Yes, concrete fence posts can be drilled for light fixings using a suitable masonry bit and hammer or SDS drill. Keep holes away from the edges and slots, and stop if the bit reaches the internal steel reinforcement. Avoid drilling damaged posts or attaching heavy gates and screens, as separate supports are more suitable for substantial loads.
How much are concrete fence posts?
Concrete fence post prices vary according to the overall length and whether an intermediate or corner post is required. Longer and corner configurations generally cost more than standard 8ft intermediate posts because their size and construction differ. Check the individual product page for current pricing, quantity discounts and delivery availability before ordering.
Can you paint concrete fence posts?
Yes, concrete fence posts can be finished with an exterior masonry paint suitable for concrete. Clean the surface thoroughly and ensure it is sound and dry, removing dirt, algae and loose material before painting. Follow the paint manufacturer’s preparation, priming and weather-condition requirements to achieve reliable adhesion.
How do you remove concrete fence posts?
Remove the fence panels and gravel boards first, then excavate around the post until its concrete foundation is exposed. Break the footing into manageable sections or remove it with suitable lifting equipment, depending on its size and site access. Check for underground services and plan mechanical assistance because concrete posts and foundations can be heavy and difficult to control manually.
How do you fit fence panels into concrete posts?
Clear debris from the post slots, then lift the fence panel vertically and lower each edge evenly into the opposing channels. Check that the posts are correctly spaced and plumb so the panel enters without excessive force or binding. Support the panel on a compatible gravel board where specified, and do not force it into damaged or misaligned slots.
How do you install concrete fence posts and gravel boards?
Mark the fence line and post positions, then set the first post plumb in a suitable concrete foundation. Slide the gravel board into its slot and use its actual width to position the next post before repeating the process along the run. Allow the foundations to develop sufficient strength according to the concrete instructions before installing the heavier fence panels.
How deep should concrete fence posts be?
Around 600mm is commonly used as a starting depth for a typical domestic fence, but the correct embedment depends on the fence height and ground conditions. Add the panel and gravel-board height to the required below-ground depth when deciding between 8ft and 9ft posts. Soft soil, exposed boundaries and taller fences may require deeper or wider foundations than a standard installation.